Table of Contents
Getting Started with DATVault
This quick guide will show you how to configure RomVault to update your DATs using DATVault. Initial setup may take a few minutes or more depending on how many DATs you plan on monitoring with DATVault.
If you have any questions feel free to ask on the ROMVault Discord. There are many active members who would be happy to assist.
Learn how DATVault works with an example
The DATRoot folder in the ROMVault executable directory is the default location for storing your DATs. Before downloading any DATs you should plan out how you want your DATs organized, which will also outline how you want your ROMs organized. For now just try a simple example to gain a better understanding of how the system works.
ROMVault comes packaged with an example DATRoot to start with. This starter DATRoot includes DATVault JSON files for MAME ROMs, CHDS, and Software Lists. These JSON files contain information about DATs you want to collect and manage with DATVault. Let's take a closer look:
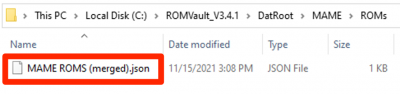
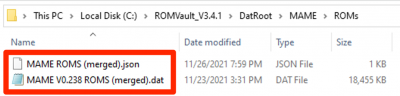
- Open the DatRoot folder in the RomVault directory and navigate around. Notice there is a JSON file in each of the MAME subdirectories
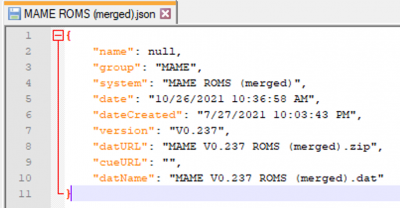
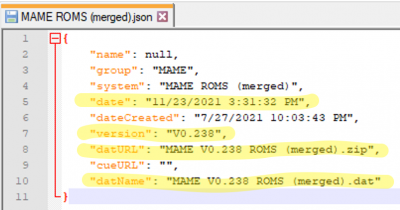
- Open one of the JSON files in a text editor if you would like to understand the contents. More information can be found here.
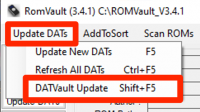
- Navigate to Update DATs > DATVault Update from the top menu
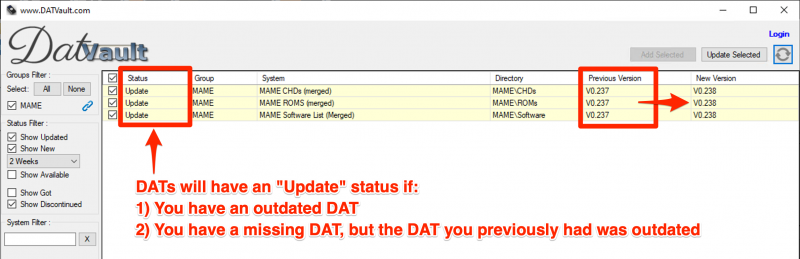
- Notice the three MAME DATs have an Update status. These DATs have an Update status because the JSON files are present in your DATRoot and there has been an update. You may also notice that the previous version differs from the current version. This difference is because the DATVault JSON files packaged as an example use MAME 0.237, which have since been updated.
- Ensure the missing MAME DATs are selected with the checkboxes and click Update Selected. After a few seconds, notice the DATs are removed from the list.

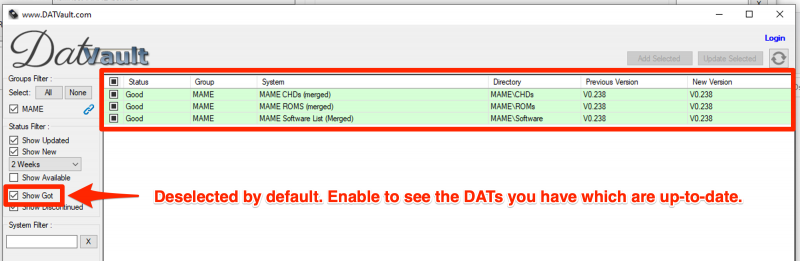
- Select the Show Got status filter on the left side of the window. Notice the DATs you just updated are displayed in the list with a green highlight and a “Good” status indicating they are up to date with the latest version available.
- Switch back to your file explorer. Notice the missing DATs were downloaded to the respective directories of the JSON files.
- Open one of the JSON files in a text editor. Note that the contents changed to reference the current DAT version that was just downloaded.
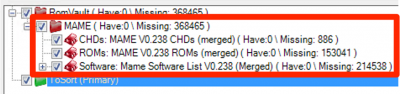
- Close the DATVault window. RomVault will do a scan for DAT changes in your DATRoot. Once the DAT scan is complete you should notice a change in the DATRoot tree showing your newly imported DATs
Now that you have a better understanding of how DATVault works, you can enter your DATVault key and add any new DATs you are interested in.
Activate full access with a DATVault Key
Anyone can use DATVault with ROMVault 3.4 and above, but it is limited to official MAME “listxml” DATs without an access key. Patreon supporters get full access to the entire DAT repository and will receive a unique access key after signing up. For more information about this, first read the What is DATVault? section.
DATVault is still very new, and a work in progress. The current process to get your access key is a bit manual:
- Sign up to be a Patreon supporter with either “DATVault Access” or “Beta Access Program” level
- Send a direct message to me (GordonJ) and let me know that you signed up. I will create a key for you.
Once you have your key, enter it in the DATVault UI:
- Navigate to Update DATs > DATVault Update from the top menu
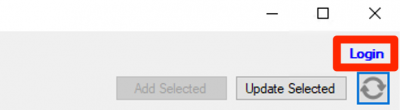
- Select the Login link from the top right of the window
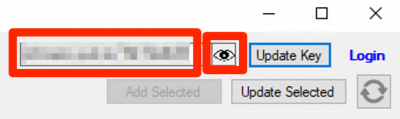
- Paste your access key into the box. You can use the eye icon to show/hide your access key.
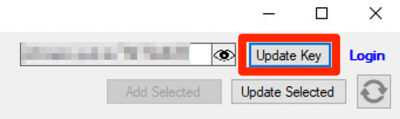
- Select Update Key
If your key was properly imported you should see the Group filters on the left side update and a list of available DATs populate in the grid.
If the key changes to a value of “Invalid” then the key you provided either has a typo or has not been provisioned. If this occurs please contact me (GordonJ) on Discord.
Add new DATs
New DATs can be added directly from the DATVault UI in a few simple steps:
DATVault does not match any existing DATs you may have managed yourself in the DATRoot. Its suggested you remove any manually managed DATs before configuring DATVault to manage those respective DATs.
- Select the Show Available status filter
- Select the groups you are interested in with the groups filter, for example TOSEC
- The DAT list should show all DATs available to download and manage with DATVault
- Select one or more DATs with an Available status using the checkboxes. Notice the Add Selected button becomes selectable.
- Click the Add Selected button
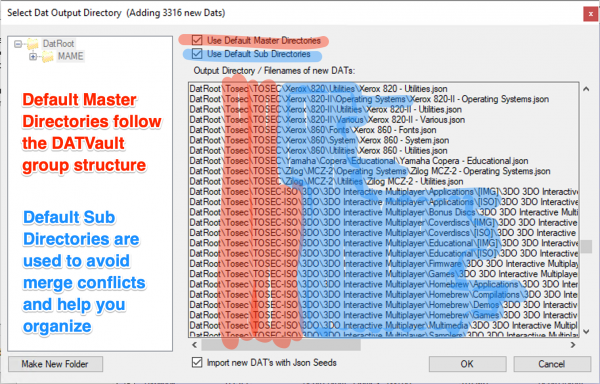
- The Select DAT Output Directory window should display
- Choose where you want to place the DATVault JSON files in your DATRoot. You may use the Use Default Master Directories and Use Default Sub Directories options to make bulk adding DATs simpler while avoiding conflicts.
- Optionally you can select the Import new DATs with JSON seeds option to download DATs immediately upon savings your output directory.
- If you chose not to automatically download, then after selecting the directory, the DATs will be listed with a Missing status because they haven't been downloaded yet
- Select the missing DATs and click Update Selected. The DATs will be downloaded to the directory you placed the JSON files. If the DATs have associated cue sheets, the cue packs will be downloaded to the
cuesfolder in your Primary ToSort directory. - Close the DATVault window and RomVault will import any new DATs
You can download several DATVault JSON files to a temporary location and move them around as you see fit with your file explorer. Once complete you can use the refresh button to update the paths.
Remove discontinued DATs
Occasionally DATs may be removed or renamed at the source. When this happens, the DATs will be flagged with a discontinued status. The discontinued status means the DATs are no longer managed under that name in the DATVault repository. To remove these DATs:
- Select one or more DATs with a discontinued status using the checkboxes
- Click the Update Selected button
- A confirmation dialog will display asking if you would like to delete the DATs. Note this dialog tells you how many DATs you are about to delete.
- Confirm the deletion by clicking the Ok button. Once the deletion is complete the DATs with the discontinued status will be removed from the list.
- Close the DATVault window and RomVault will refresh the DATs and remove the references for the DATs you chose to delete
When DATVault removes discontinued DATs it only removes the current DAT and associated JSON file from the DATRoot. Any old DATs and directories are not deleted. If you would like to remove these you can do so manually or by clicking the trash can icon from the DATVault window.
Additional Resources
Now that you are able to add, update, and remove DATs using DATVault, here are some additional resources to help learn more about the DATs supported: